Flutter App Architecture - Data Layer


This article is a complete guide to the data layer, covering data sources, providers, repositories, error handling, caching, testing and more. For the best grasp of the topic, read the sections sequentially, as each builds upon the previous one.
Table of Contents
Understanding Data Sources
Data sources directly interact with raw data providers, which are generally of two types:
- Local: These store data on the device, like databases (SQLite, SharedPreferences), caches, and file I/O.
- Remote: These keep data offsite, such as in the cloud, on company servers, or through services like Firebase and Supabase.
Data sources process responses and errors from data providers, managing communication as an intermediary with a simplified, efficient API.
Data sources typically support some or all CRUD (create, read, update, delete) functions. For instance, adding a user to a local database is a create operation, while modifying user properties is an update operation.
Each data source features an interface, serving as an agreement between the data source and a higher-level module. Below are two examples of such interfaces: ArticlesDataSource and CartDataSource:
abstract class ArticlesDataSource {
  // Operation to read articles (R)
  Future<List<ArticleDto>> fetchArticles();
}

abstract class CartDataSource {
  // Operation to read cart items (R)
  Future<List<CartItemDto>> fetchCartItems();

  // Operation to create a cart item (C)
  Future<void> addCartItem(CartItemDto cartItem);

  // Operation to update a cart item (U)
  Future<void> updateCartItem(CartItemDto cartItem);

  // Operation to delete a cart item (D)
  Future<void> deleteCartItem(CartItemDto cartItem);
}
ArticlesDataSource enables articles reading, while CartDataSource provides full CRUD operations for cart management. Despite their distinct functions, they share similarities: each method returns a Future, and read operations yield DTOs.
Importance of Interfaces
Companies typically start with PaaS or SaaS, enjoying early success. As their monthly active users (MAU) and workload grow, so do costs, prompting a shift to custom backends and self-implemented services.
Established interfaces are crucial in these scenarios. They enable seamless migration to new implementations without causing any changes in other layers. Key rules must be followed:
- Data sources must always return a model (DTO) that is constructed from raw data obtained from data provider.
- Data source must handle the exceptions of an underlying data provider and convert them to system-recognized exceptions.
- Data source methods should return futures. There should be no synchronous APIs, even if some library (e.g. SharedPreferences) gives you this ability.
Further in the article, we delve into these rules in detail. For now, let's focus on implementing the ArticlesDataSource interface.
class ArticlesDataSourceImpl implements ArticlesDataSource {
  final HttpClient _httpClient;

  ArticlesDataSourceImpl(this._httpClient);

  @override
  Future<List<ArticleDto>> fetchArticles() async {
    try {
      final response = await _httpClient.get('https://jsonplaceholder.typicode.com/posts');
      final json = jsonDecode(response.body) as List<Object?>;

      // Convert json to List<ArticleDto>
      return json.map((e) => ArticleDto.fromJson(e)).toList();
    } on SocketException (e, stackTrace) {
      Error.throwWithStackTrace(NetworkException(e), stackTrace);
    }
  }
}
ArticlesDataSourceImpl employs HttpClient for network requests, decoding JSON responses into an articles list. It manages SocketException by throwing a standardized NetworkException.
Should we opt to switch data providers in the future, the process will be straightforward. Let's rewrite the example using Dio:
class ArticlesDataSourceDio implements ArticlesDataSource {
  final Dio _dio;

  ArticlesDataSourceDio(this._dio);

  @override
  Future<List<ArticleDto>> fetchArticles() async {
    try {
      final response = await _dio.get('https://jsonplaceholder.typicode.com/posts');
      final json = response.data as List<Object?>;

      // Convert json to List<Article>
      return json.map((e) => Article.fromJson(e)).toList();
    } on DioException {
      throw NetworkException();
    }
  }
}
Dio delivers responses in a bit different format and introduces DioException. However, the code adapts seamlessly, ensuring this data source remains in line with its defined contract.
Data Transfer Object
Data Transfer Object is a basic class focused solely on data transport. It can be simple containing a few fields and large, contain other DTOs and great amount of fields.
A fundamental rule for all data sources is to return DTOs. Data sources must convert raw data to these models and never return JSON, bytes, database rows and even database generated models.
Benefits of a data source returning your models include:
- Facilitates migration to different solutions due to the data source interface not being tied to a specific implementation.
- Adheres to the separation of concerns principle, ensuring that higher-level modules remain within their designated scope of responsibility.
- Prevents higher-level system components from being bound to specific implementations, enhancing overall system flexibility.
Let's observe this example of a profile data source:
class ProfileDto {
  final int id;
  final String name;
  final String email;
  final String phone;
  final String avatarUrl;
  final DateTime dateOfBirth;

  ProfileDto({
    required this.id,
    required this.name,
    required this.email,
    required this.phone,
    required this.avatarUrl,
    required this.dateOfBirth,
  });

  factory ProfileDto.fromJson(Map<String, Object?> json) {
    return ProfileDto(
      id: json['id'],
      name: json['name'],
      email: json['email'],
      phone: json['phone'],
      avatarUrl: json['avatarUrl'],
      dateOfBirth: DateTime.parse(json['dateOfBirth']),
    );
  }
}

class ProfileDataSourceNetwork implements ProfileDataSource {
  final RestClient _restClient;

  ProfileDataSourceNetwork(this._restClient);

  @override
  Future<ProfileDto> fetchProfile() async {
    final response = await _restClient.get('/profile');
    return ProfileDto.fromJson(response);
  }
}
The fetchProfile method initiates a network request to obtain JSON data, which is subsequently decoded into a ProfileDto. Now imagine, you are tasked to migrate this data source to firebase. Will it be hard for you? Not really.
Error handling
Data providers may throw exceptions like DioException in Dio or SocketException in http, often due to network request problems. Databases, services, and backends may return custom exceptions. Data source has to capture and translate them into system-recognized types.
Again, as with models, this is necessary to make the data source interface independent of its implementation. This approach makes it possible to use abstractions for the exceptions and doesn't depend on exceptions of a particular data provider, since the data provider is subject to change.
For every manageable exception (like database returning no rows or incorrect user credentials), the system should define a new exception type, as demonstrated:
/// User does not exist (database returned zero rows)
class UserDoesNotExistException implements Exception {}

/// Coupon is already used
class CouponIsAlreadyUsedException implements Exception {}

/// Not enough balance to pay for the order
class InsufficientBalanceException implements Exception {}
When a data source intercepts an exception from a data provider, it should convert it into a universally recognized system exception. Consider this example:
class PaymentDataSourceImpl implements PaymentDataSource {
  final RestClient _restClient;

  PaymentDataSourceImpl(this._restClient);

  @override
  Future<void> makePayment(PaymentDto payment) async {
    try {
      await _restClient.post('/payment', body: payment.toJson());
    } on CustomBackendException catch (e, stackTrace) {
      if (e.error case {'code': 'INSUFFICIENT_FUNDS'}) {
        Error.throwWithStackTrace(InsufficientFundsException(), stackTrace);
      }

      rethrow;
    }
  }
}
This PaymentDataSource attempts a payment and catches an INSUFFICIENT_FUNDS exception, which can be managed by the widgets layer for a clear error message.
For a more detailed understanding, I recommend reading my article:
 Michael Lazebny

Improve network requests
Instead of directly interacting with HTTP clients, consider implementing a centralized solution. Here's an essential tip: Create a wrapper that internally utilizes an HTTP client.
This wrapper should handle the logic of interpreting responses, custom errors, and external errors (like no internet connectivity or format exceptions) in a unified manner. An interface for this functionality may look like this:
/// {@template rest_client}
/// A REST client for making HTTP requests.
/// {@endtemplate}
abstract class RestClient {
  /// Sends a GET request to the given [path].
  Future<Map<String, Object?>?> get(
    String path, {
    Map<String, Object?>? headers,
    Map<String, Object?>? queryParams,
  });

  /// Sends a POST request to the given [path].
  Future<Map<String, Object?>?> post(
    String path, {
    required Map<String, Object?> body,
    Map<String, Object?>? headers,
    Map<String, Object?>? queryParams,
  });

  ...
}
The interface provides only RESTful methods. Regardless of the chosen implementation (Dio, Http, cupertino_http, etc.), it must conform to these methods.
For consistency, the backend should standardize responses, ensuring both errors and successes follow a uniform structure across methods. The JSON representation of this would appear as follows:
{
  "status": "success",
  "code": 200,
  "message": "Request processed successfully.",
  "data": {
    // The actual data payload goes here. This can be an object, array, or any other type of data.
  },
  "error": {
    // custom backend errors go here. Any fields and objects can be stored here.
  }
}
The purpose of this wrapper is to interpret the standardized response, extracting either data or errors. For instance, implementing this class with the Dio HTTP client could be structured like this:
final class RestClientDio extends RestClientBase {
  /// {@macro rest_client_dio}
  RestClientDio({required super.baseUrl, required Dio dio}) : _dio = dio;

  final Dio _dio;

  /// Send [Dio] request
  @protected
  @visibleForTesting
  Future<Map<String, Object?>?> sendRequest<T extends Object>({
    required String path,
    required String method,
    Map<String, Object?>? body,
    Map<String, Object?>? headers,
    Map<String, Object?>? queryParams,
  }) async {
    try {
      final uri = buildUri(path: path, queryParams: queryParams);
      final options = Options(
        headers: headers,
        method: method,
        contentType: 'application/json',
        responseType: ResponseType.json,
      );

      final response = await _dio.request<T>(
        uri.toString(),
        data: body,
        options: options,
      );

      final resp = await decodeResponse(
        response.data,
        statusCode: response.statusCode,
      );

      return resp;
    } on RestClientException {
      rethrow;
    } on DioException catch (e) {
      if (e.type == DioExceptionType.connectionError ||
          e.type == DioExceptionType.sendTimeout ||
          e.type == DioExceptionType.receiveTimeout) {
        Error.throwWithStackTrace(
          ConnectionException(
            message: 'ConnectionException',
            statusCode: e.response?.statusCode,
            cause: e,
          ),
          e.stackTrace,
        );
      }
      if (e.response != null) {
        final result = await decodeResponse(
          e.response?.data,
          statusCode: e.response?.statusCode,
        );

        return result;
      }
      Error.throwWithStackTrace(
        ClientException(
          message: e.toString(),
          statusCode: e.response?.statusCode,
          cause: e,
        ),
        e.stackTrace,
      );
    } on Object catch (e, stack) {
      Error.throwWithStackTrace(
        ClientException(message: e.toString(), cause: e),
        stack,
      );
    }
  }

  @override
  Future<Map<String, Object?>?> get(
    String path, {
    Map<String, Object?>? headers,
    Map<String, Object?>? queryParams,
  }) =>
      sendRequest(
        path: path,
        method: 'GET',
        headers: headers,
        queryParams: queryParams,
      );

  ...
}
The provided implementation uses Dio as the data provider. It builds and sends requests to the server and decodes the responses. Notice how this class manages network exceptions coming from Dio and converts to NetworkException.
This code relies on decodeResponse method that returns Map<String, Object?>?. Code for this method looks as follows:
  @protected
  @visibleForTesting
  Map<String, Object?>? decodeResponse(
    Map<String, Object?>? body, {
    int? statusCode,
  }) {
    if (body == null) return null;
    try {
      if (body case {'error': final Map<String, Object?> error}) {
        throw CustomBackendException(
          message: 'Backend returned custom error',
          error: error,
          statusCode: statusCode,
        );
      }

      if (body case {'data': final Map<String, Object?> data}) {
        return data;
      }

      return null;
    } on RestClientException {
      rethrow;
    } on Object catch (e, stackTrace) {
      Error.throwWithStackTrace(
        ClientException(
          message: 'Error occured during decoding',
          statusCode: statusCode,
          cause: e,
        ),
        stackTrace,
      );
    }
  }
decodeResponse checks for an 'error' field in the response JSON. If present, it creates a CustomBackendException using the error details, helping to identify specific issues like form validation errors.
If no error is found, it looks for a 'data' field containing the response (like user profiles or posts) for further parsing. This approach centralizes network operations in one class, simplifying network operations and enhancing testing, as explained later.
See how it works in action:
abstract interface class LogisticsDataSource {
  Future<void> deliverOrder(OrderDto order);
}

class LogisticsDataSourceImpl implements LogisticsDataSource {
  final RestClient _restClient;

  LogisticsDataSourceImpl(this._restClient);

  @override
  Future<void> deliverOrder(OrderDto order) async {
    try {
      // no encoding/decoding logic.
      await _restClient.post('/logistics', body: order.toJson());

      // We can handle errors from backend easily
    } on CustomBackendException catch (e, stackTrace) {
      // if order is not found, throw OrderNotFoundException
      if (e.error case {'code': 'ORDER_NOT_FOUND'}) {
        Error.throwWithStackTrace(OrderNotFoundException(), stackTrace);
      }

      rethrow;
    }
  }
}
RestClient allows the data source to focus solely on working with data and handling custom errors. Encoding/decoding and error handling logic is delegated to RestClient.
To see the full code of RestClient, please follow this link:
 hawkkiller
Repository
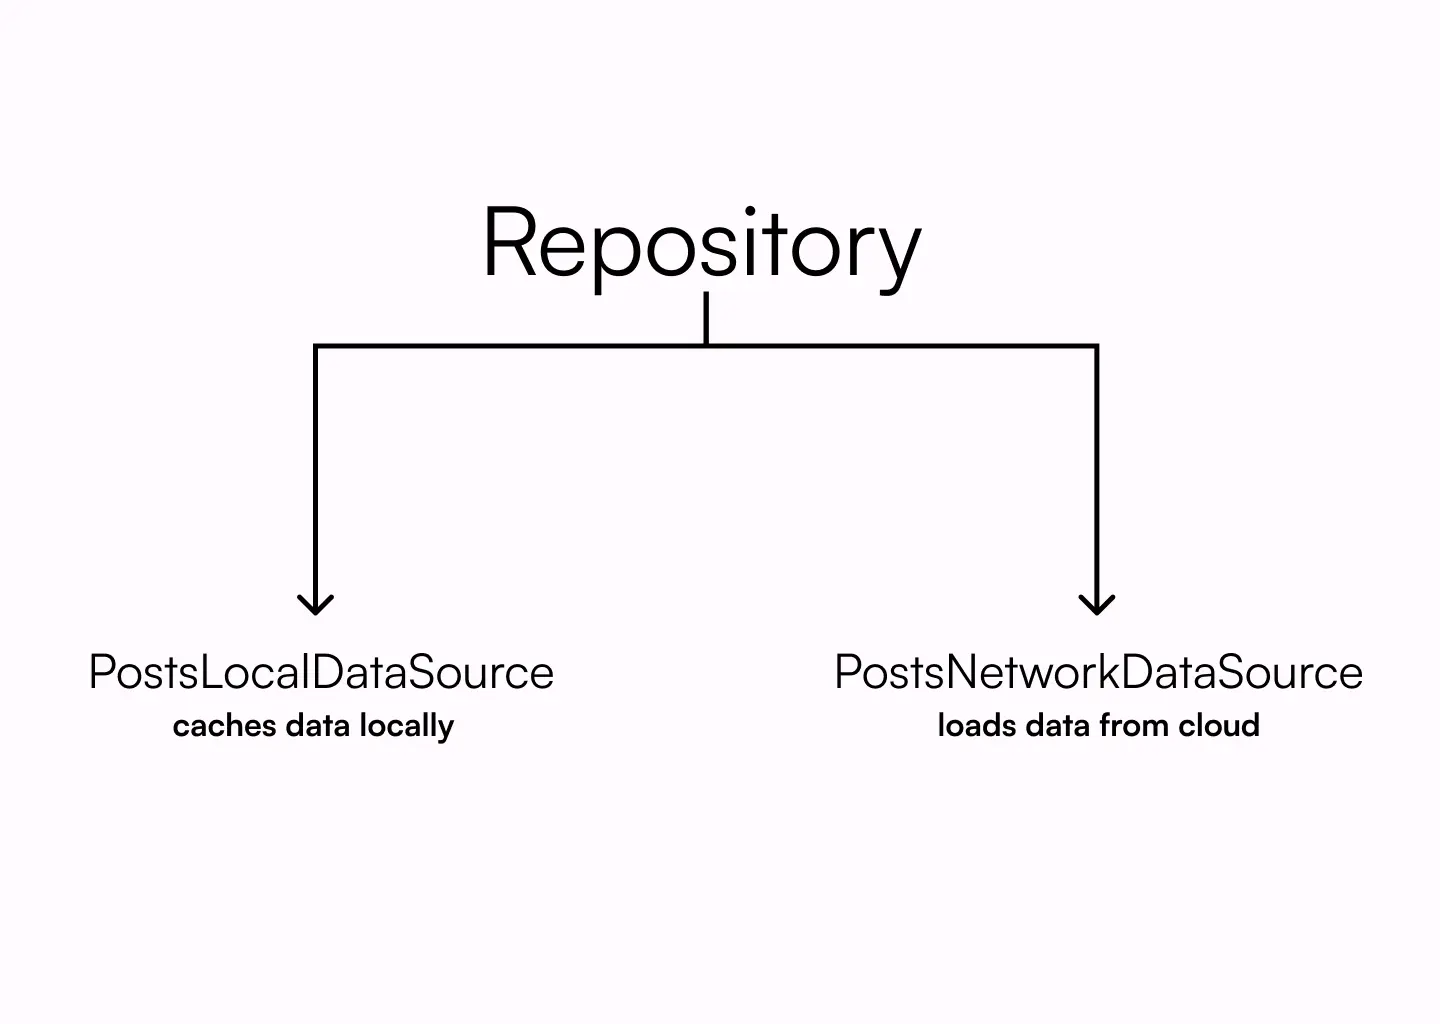
The Repository pattern is a popular design pattern used to decouple the business logic layer from actual data sources. It manages caching, combines data sources and optionally converts models.
Business Models
Repositories can transform data transfer objects when needed. This is useful for:
- Combining data from various sources.
- Limiting data exposure to only what's used.
In apps drawing data from various sources, business models should combine elements from different DTOs.
Example: A repository merging UserDTO and AddressDTO:
class UserDTO {
  final String name;
  final int age;

  UserDTO({required this.name, required this.age});
}

class AddressDTO {
  final String street;
  final String city;

  AddressDTO({required this.street, required this.city});
}

// Define Business Model
class User {
  final String name;
  final int age;
  final String street;
  final String city;

  User({required this.name, required this.age, required this.street, required this.city});
}

// Repository Class
class UserRepositoryImpl implements UserRepository {
  final UserDataSource _userDataSource;
  final AddressDataSource _addressDataSource;

  UserRepositoryImpl(this._userDataSource, this._addressDataSource);

  @override
  Future<User> getUser() async {
    final userDto = await _userDataSource.fetchUser();
    final addressDto = await _addressDataSource.fetchAddress();

    return _mapToUser(userDto, addressDto);
  }


  User _mapToUser(UserDTO userDto, AddressDTO addressDto) {
    return User(
      name: userDto.name,
      age: userDto.age,
      street: addressDto.street,
      city: addressDto.city,
    );
  }
}
UserRepository gathers data from two sources and merges them using the _mapToUser method.
Expose only needed data
Data sources should deliver only relevant information for the application. However, it's not often the case. In scenarios where application uses just a portion of this data, converting from a Data Transfer Object (DTO) to a business model with only the needed fields is advisable. This enhances model clarity and focus, segregates responsibilities, and simplifies adaptation to changes in DTO.
See how BookDto can be converted to a more focused Book model:
class BookDto {
  final int id;
  final String title;
  final String content;
  final DateTime publicationDate;
  final List<BookDto> editions;
  final List<ReviewDto> reviews;
  final DateTime lastEditionDate;
  final int authorId;
  final String authorName;
  final DateTime authorDateOfBirth;
  final int pageCount;

  BookDto({
    required this.id,
    required this.title,
    required this.content,
    required this.publicationDate,
    required this.editions,
    required this.reviews,
    required this.lastEditionDate,
    required this.authorId,
    required this.authorName,
    required this.authorDateOfBirth,
    required this.pageCount,
  });
}

class Book {
  final int id;
  final String title;
  final String content;
  final DateTime publicationDate;
  final String authorName;
  final int pageCount;

  Book({
    required this.id,
    required this.title,
    required this.content,
    required this.publicationDate,
    required this.authorName,
    required this.pageCount,
  });
}
The application doesn't need that much information about a book, so the repository converts the DTO to a book model.
Caching
A repository's pivotal responsibility is to manage data caching effectively. This is particularly efficient for handling data that does not require frequent updates or real-time accuracy.
Caching is ideal for data that doesn't change often, like configuration settings, static reference data, or user-independent information.
To enhance UI/UX, applications may cache certain data, enabling quick display of this information before network requests are completed or in offline. These apps are offline-capable, offering limited functionality without relying primarily on local data.
Example - News App. Imagine a digital news platform akin to the New York Times or BBC. Such apps feature a dynamic homepage filled with various news articles and updates from a backend.
These apps aren't primarily designed for offline use, but they can be enhanced to support it. For example, new articles from the backend can be saved in a database, allowing access during internet outages or other disruptions.
Additionally, we can cache individual articles in memory. This means if a user reopens an article, it won't require a new server request. We will use a map for it, but it is advised to use more advanced caching mechanisms.
To illustrate, consider this implementation for a repository that fetches an article's content:
abstract interface class ArticleDetailsDataSource {
  Future<({Article article, bool cached})> fetchArticle(String id);
}

class ArticleDetailsRepository implements ArticleDetailsDataSource {
    final ArticleDetailsDataSource networkSource;
    final _cache = <String, Article>{};

    ArticleDetailsRepository({required this.networkSource});

    @override
    Future<({Article article, bool cached})> fetchArticle(String id, {bool cache = true}) async {
        if (_cache.containsKey(id) && cache) {
          final article = _cache[id]!;
          return (article: article, cached: true);
        }

        final article = await networkSource.fetchArticle(id);
        _cache[id] = article;
        return (article: article, cached: false);
    }
}
The 'fetchArticle' method retrieves article content from the cache if present. If not, it loads from the backend. Adding a cache indicator helps identify whether the data is fresh or not. Widgets can use this to alert users of outdated data and offer refresh options. Caching articles also benefits users without internet, allowing offline access.
For caching article headlines, we adopt a distinct approach. Users prefer current news, not outdated. This requires a different caching strategy. We'll offer two repository methods: one for cached news, another for fresh news. Error handling and deciding how to use cached data will be managed by the bloc.
The bloc can follow various strategies, such as initially displaying cached data, then updating with fresh data after a network request. Alternatively, it might show only fresh network data, resorting to cached data if there's a network failure.
The repository for this case may look like this:
abstract class ArticlesDataSource {
  Future<List<Article>> fetchArticles();
}

abstract class ArticlesLocalDataSource implements ArticlesDataSource {
  Future<void> cacheArticles(List<Article> articles);
}

abstract class ArticlesRepository {
  Future<List<Article>> fetchArticles();

  Future<List<Article>> fetchArticlesFromCache();
}

class ArticlesRepositoryImpl implements ArticlesRepository {
  final ArticlesLocalDataSource localDataSource;
  final ArticlesDataSource networkDataSource;

  ArticlesRepositoryImpl({
    required this.localDataSource,
    required this.networkDataSource,
  });

  @override
  Future<List<Article>> fetchArticlesFromCache() async {
    final articles = await localDataSource.fetchArticles();
    return articles;
  }

  @override
  Future<List<Article>> fetchArticles() async {
    final articles = await networkDataSource.fetchArticles();
    localDataSource.cacheArticles(articles).ignore();
    return articles;
  }
}
The code includes two methods that utilize both local and network data sources. The fetchArticles method caches newly loaded articles, which are then retrievable through the fetchArticlesFromCache method.
Testing
Testing is crucial in software development to ensure components or systems function correctly under various scenarios. Unit Testing, the simplest and most common type, focuses on individual components in isolation. These components are tested with mock implementations, not real-world classes, to:
- Assess behavior in both successful and failing scenarios.
- Isolate the component, protecting it from issues in other components.
To test how components work together in real-world flows (e.g. making a payment), integration testing is used. I will cover it in later articles because it requires a complete understanding of an architecture.
Naturally, there are two types of data providers: local and network and each one requires slightly different approach. Read next sections to understand how to actually write tests.
Testing Network Data Sources
A network data source is a data source that uses a network data provider such as HttpClient, Dio or Firebase.
Mocking data providers, which are external dependencies, can be challenging. To simplify, consider these practices:
- Use wrappers for HTTP clients, integrating REST methods with HTTP client internally.
- For external libraries like Firebase, explore libraries offering fake and mock implementations.
- Always provide dependencies via constructor, even if you are dealing with singletons like Firebase.
Using wrappers like RestClient, as previously mentioned, simplifies and centralizes request/response logic, significantly easing testing.
Mocking an HTTP client is complex and code-intensive due to internal library structures. Fortunately, with a wrapper, testing involves returning mock Dart maps or exceptions, bypassing tedious tasks like handling status codes, byte conversion, and JSON parsing.
Consider a data source fetching shops data from a server as an example:
final class ShopsDataSourceNetwork implements ShopsDataSource {
  final RestClient _restClient;

  const ShopsDataSourceNetwork(this._restClient);

  @override
  Future<List<ShopDto>> fetchShops() async {
    try {
      // response is Map<String, Object?>
      final response = await _restClient.get('/shops');
      // if response JSON has a key 'shops' and its value is a list of shops
      // then return a list of shops
      if (response case {'shops': final List<Object?> shops}) {
        return shops
            .whereType<Map<String, Object?>>()
            .map(ShopDto.fromJson)
            .toList();
      }

      // if response is not a list of shops, throw FormatException
      throw const FormatException();

      // RestClient throws CustomBackendException if JSON has 'error' key
    } on CustomBackendException catch (e, stackTrace) {
      // custom backend exception provides 'error' field that
      // contains JSON of the error, so we can handle it
      if (e.error case {'code': 10001}) {
        Error.throwWithStackTrace(NotEnoughPermissionsException(), stackTrace);
      }

      // If we can't handle the exception, rethrow it
      rethrow;
    }
  }
}
The data source fetches a list of shops in JSON format, converting it into Dart models. It throws a FormatException for invalid JSON structures. Interestingly, it also manages custom backend exceptions.
RestClient, by design, throws a CustomBackendException if the backend response includes an error field, which itself is a JSON with a customizable structure. The data source checks this JSON for specific codes; for example, code 10001 indicates a NotEnoughPermissionsException, which it then throws, so that widgets can handle this exception to display a clear error message.
Regarding unit tests, their purpose is to evaluate the data source's functionality, particularly its handling of errors and successful responses. We'll develop a test focusing on a successful process flow, utilizing mockito for creating mocks.
test('Nice flow', () async {
    // Arrange
    final restClient = MockRestClient();
    final dataSource = ShopsDataSourceNetwork(restClient);

    // Act
    when(restClient.get('/shops')).thenAnswer(
      (_) async => {
        'shops': [
          {'id': 1, 'name': 'Shop 1'},
          {'id': 2, 'name': 'Shop 2'},
        ],
      },
    );
    final result = await dataSource.fetchShops();

    // Assert
    expect(result, [
      const ShopDto(id: 1, name: 'Shop 1'),
      const ShopDto(id: 2, name: 'Shop 2'),
    ]);
  })
This test ensures that if RestClient yields a valid JSON structure, the data source correctly interprets it into a List of ShopDto. For this test's success, it's important for ShopDto to override equality in the following manner:
class ShopDto {
  final int id;
  final String name;

  const ShopDto({required this.id, required this.name});

  factory ShopDto.fromJson(Map<String, Object?> json) => ShopDto(
        id: json['id']! as int,
        name: json['name']! as String,
      );

  @override
  bool operator ==(Object other) =>
      identical(this, other) ||
      other is ShopDto && id == other.id && name == other.name;

  @override
  int get hashCode => id.hashCode ^ name.hashCode;
}
Now, let's create a test case that verifies the data source when the custom backend exception is thrown.
test('Not enough permissions', () async {
    // Arrange
    final restClient = MockRestClient();
    final dataSource = ShopsDataSourceNetwork(restClient);

    // Act
    when(restClient.get('/shops')).thenThrow(
      const CustomBackendException(
        message: 'Backend returned custom error',
        error: {'code': 10001},
      ),
    );

    // Assert
    await expectLater(
      () => dataSource.fetchShops(),
      throwsA(isA<NotEnoughPermissionsException>()),
    );
  })
This test confirms that when the RestClient throws a CustomBackendException with code 10001, the data source maps it to a NotEnoughPermissionsException.
When integrating third-party services like Firebase, the strategy changes. Rather than creating mocks, it's recommended to use fakes. Numerous libraries offer fake functionalities to aid in testing, such as fake_cloud_firestore.
Testing Local Data Sources
Local data sources utilize databases or filesystems for data storage on the device. For instance, a data source might use a key-value database like SharedPreferences for settings, SQLite for structured data, or I/O files for other types of data.
Usually, databases can operate in in-memory environment, so that all the data is stored in RAM. For example, SQLite and SharedPreferences can be configured to use memory filesystem for tests. Take a look at this data source that uses SharedPreferences:
final class SettingsDataSourceLocalImpl implements SettingsDataSourceLocal {
  final SharedPreferences _sharedPreferences;

  const SettingsDataSourceLocalImpl(this._sharedPreferences);

  @override
  Future<String?> fetchLocale() async {
    final locale = _sharedPreferences.getString('locale');
    return locale;
  }

  @override
  Future<void> saveLocale(String locale) async {
    await _sharedPreferences.setString('locale', locale);
  }
}
It simply stores and loads data locale from shared preferences. Now, let's write a few tests:
  test('Returns locale successfully', () async {
    SharedPreferences.setMockInitialValues({'locale': 'en'});

    final sharedPreferences = await SharedPreferences.getInstance();

    final dataSource = SettingsDataSourceLocalImpl(sharedPreferences);

    final locale = await dataSource.fetchLocale();

    expect(locale, 'en');
  });

  test('Saves locale successfully', () async {
    SharedPreferences.setMockInitialValues({'locale': 'en'});

    final sharedPreferences = await SharedPreferences.getInstance();

    final dataSource = SettingsDataSourceLocalImpl(sharedPreferences);

    await dataSource.saveLocale('es');

    final locale = await dataSource.fetchLocale();

    expect(locale, 'es');
  });

  test('Returns null if locale is not set', () async {
    SharedPreferences.setMockInitialValues({});

    final sharedPreferences = await SharedPreferences.getInstance();

    final dataSource = SettingsDataSourceLocalImpl(sharedPreferences);

    final locale = await dataSource.fetchLocale();

    expect(locale, null);
  });
The SharedPreferences.setMockInitialValues method initializes SharedPreferences with specific values and configures it to operate with an InMemory implementation, essentially a Map.
Same way it works with SQLite. I use Drift library to build queries and it has some tools to make the interaction much easier, see the setup:
/// Todos table definition
class TodosTable extends Table {
  /// The identifier for this todo.
  IntColumn get id => integer().autoIncrement()();

  /// The title of this todo.
  TextColumn get title => text().withLength(min: 6, max: 32)();

  /// The content of this todo.
  TextColumn get content => text().named('body')();

  /// Category of this todo.
  IntColumn get category => integer().nullable()();
}

@DriftDatabase(tables: [TodosTable])
class AppDatabase extends _$AppDatabase {
  AppDatabase([QueryExecutor? executor]) : super(executor ?? createExecutor());

  @override
  int get schemaVersion => 1;
}
The @DriftDatabase class enables database interaction and accepts a QueryExecutor in its constructor, allowing for the use of an in-memory implementation.
Here's an example of a data source utilizing this database:
class TodosDataSource {
  final AppDatabase _db;

  TodosDataSource(this._db);

  Future<List<TodoDto>> getAllTodos() async {
    final result = await _db.select(_db.todosTable).get();

    return result
        .map((e) => TodoDto(
              title: e.title,
              content: e.content,
            ))
        .toList();
  }

  Future<void> insertTodos(List<TodoDto> todos) async {
    await _db.batch((batch) {
      batch.insertAll(
        _db.todosTable,
        todos
            .map(
              (e) => TodosTableCompanion(
                title: Value(e.title),
                content: Value(e.content),
              ),
            )
            .toList(),
      );
    });
  }
}
This data source handles storing and retrieving todos in sqlite. The getAllTodos method fetches all todos from the database, while insertTodos adds todos to the database.
Let's add a test with in-memory implementation!
  test('Returns Successfully', () async {
    // Create in memory database
    final db = AppDatabase(NativeDatabase.memory());
    final dataSource = TodosDataSource(db);

    // Create a new todo
    final todo = TodoDto(title: 'Hello, World', content: 'Test');

    // Insert todo
    await dataSource.insertTodos([todo]);

    // Get all todos
    final todos = await dataSource.getAllTodos();

    // Check if todo is inserted
    expect(todos.length, 1);

    // Check if todo is inserted correctly
    expect(todos.first.title, todo.title);
  });
This test confirms that the data source works as expected in a successful flow. Notice, how it uses NativeDatabase.memory. This parameter configures the database to store the data in the memory, instead of storing it on device.
Every database should ideally support in-memory implementation. If not available, using mocks or fake implementations is an alternative. However, the lack of this feature could be a concern for the database.
Architecture Recommendations
This section focuses on best practices when designing data layer.
- Strongly Recommended. Keep data sources and repositories independent. For example, a repository should not depend on another repository.
- Strongly Recommended. Convert responses from data providers into data transfer objects. This ensures that your interface is independent and easily adaptable.
- Strongly Recommended. Handle exceptions from data providers at the data source level. It should convert provider-specific exceptions to system exceptions.
- Strongly Recommended. Establish interfaces for data sources and repositories. Design before code.
- Strongly Recommended. Create wrappers for HTTP clients that encapsulate encoding/decoding/error handling logic.
- Strongly Recommended. Use verified libraries for data providers – Drift, SharedPreferences, Http, Dio.
- Strongly Recommended. Use dependency injection. This helps in testing and application maintenance.
- Recommended. Use json_annotation to generate to and fromJson methods.
- Recommended. Use freezed for models or override equality manually.
- Recommended. Create repository, even if there is only one data source.
- Recommended. Create mapper classes that convert class A to class B.
- Optional. Convert data transfer objects to business models in repositories.