Mastering Error Handling in Dart


Gain a clear understanding of exceptions versus errors, hone your try/catch skills, and effectively manage stack traces. Also included: a critical perspective on the either method.
Why it matters: Error handling is essential in every program (e.g., no internet, file not found) and must be kept maintainable.
Table of Contents
- Exceptions vs Errors
- Throwing errors
- Catching Errors
- The power of stackTrace
- Handling uncaught errors
- How to use exceptions
- Best practices
- What about Either
Exceptions vs Errors
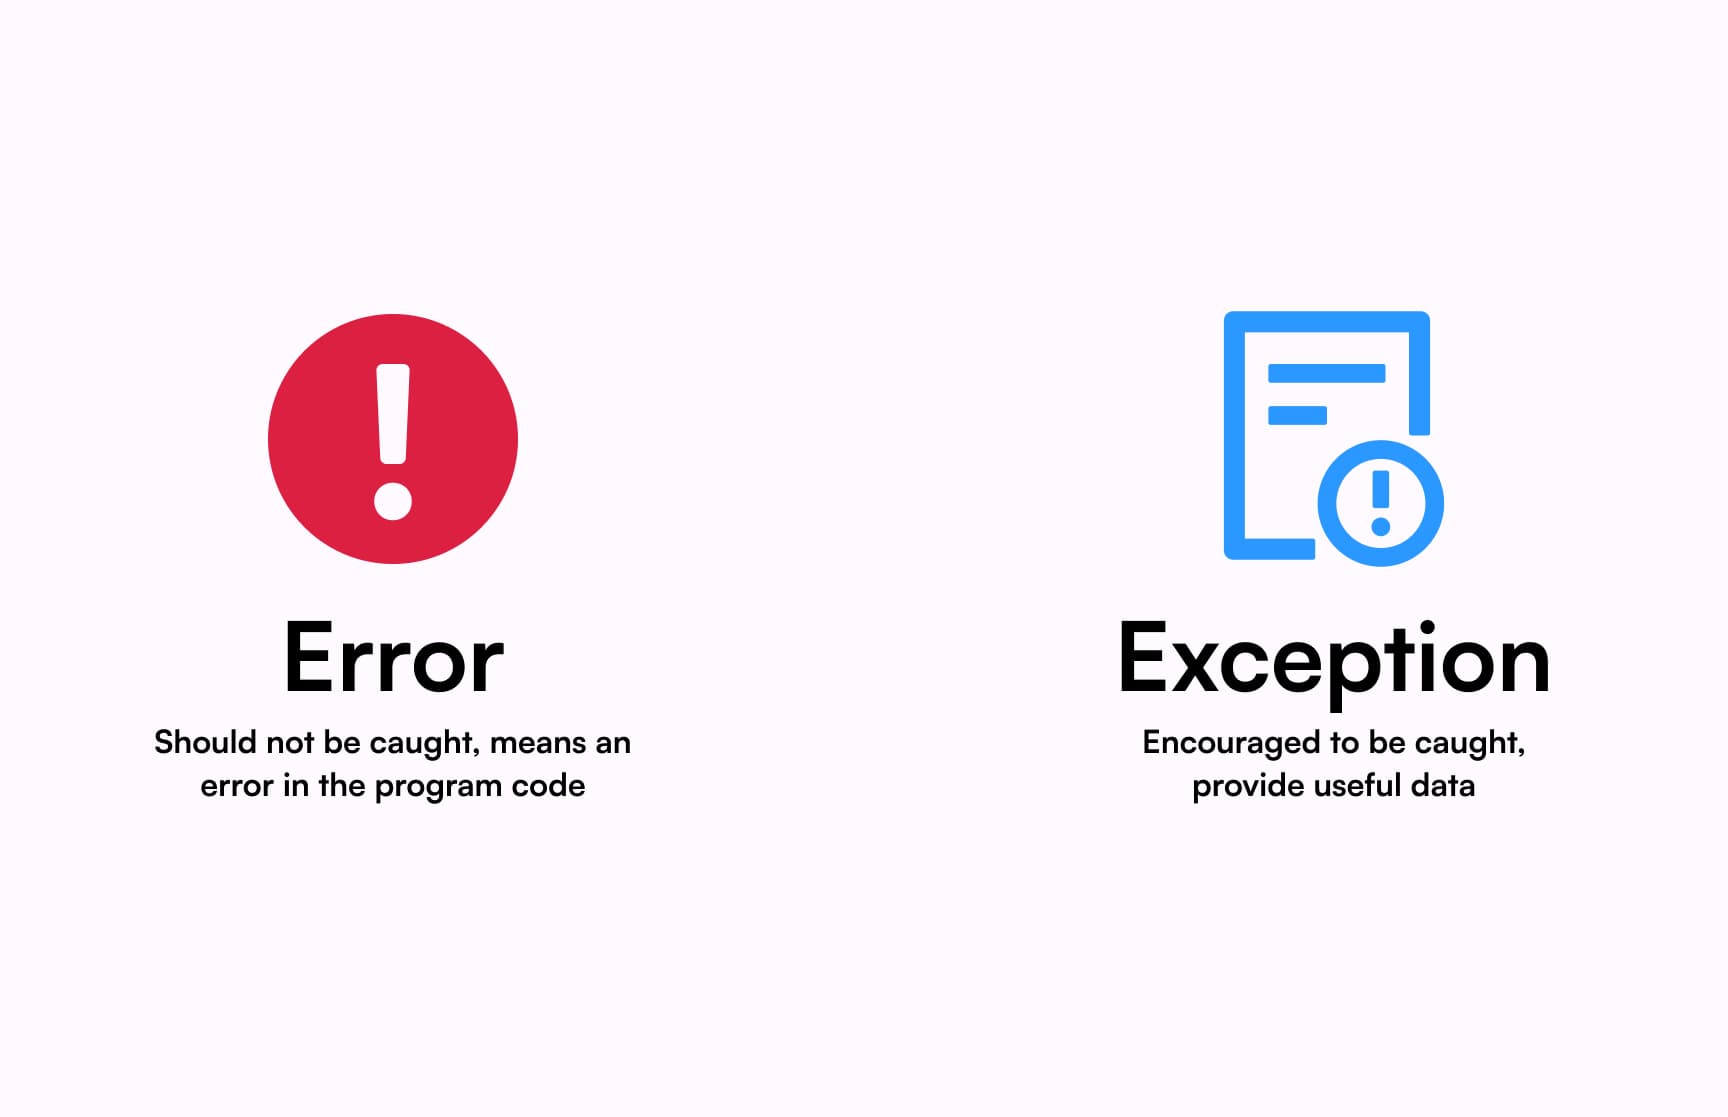
Dart offers two interfaces: Error and Exception.
Exceptions are intended to be caught because they provide useful information about an error (no Internet, lack of privileges, wrong PIN code) so that it can be handled programmatically.
Errors are destructive and represent failures that should have been avoided (no Firebase config files, NullPointerException, StateError). If the conditions are not detectable before calling a function, the called function should not throw an error.
Throwing errors
Dart utilizes exception-throwing for errors, allowing them to be raised in one location and managed elsewhere, typically to relay valuable runtime information. The code below demonstrates various error scenarios:
throw UserIsNotVerifiedException();
throw 'HelloWorld!';
throw StateError();
throw UnsupportedError();Catching errors
In Dart, all code can potentially throw exceptions. Use try/catch blocks to manage them. The try block runs code that might throw an exception. If an exception occurs, the catch block catches and handles it:
try {
  sendPost();
} catch (e) {
  print('Error occured: $e');
}The catch block provides access to the exception object for further action. Dart also allows handling specific exceptions using the on keyword. This creates targeted handlers for particular exception types:
Using on with catch gives detailed information about the exception. Remember, the order of on handlers matters. Place specific exceptions before general ones to ensure correct catching.
The power of StackTrace
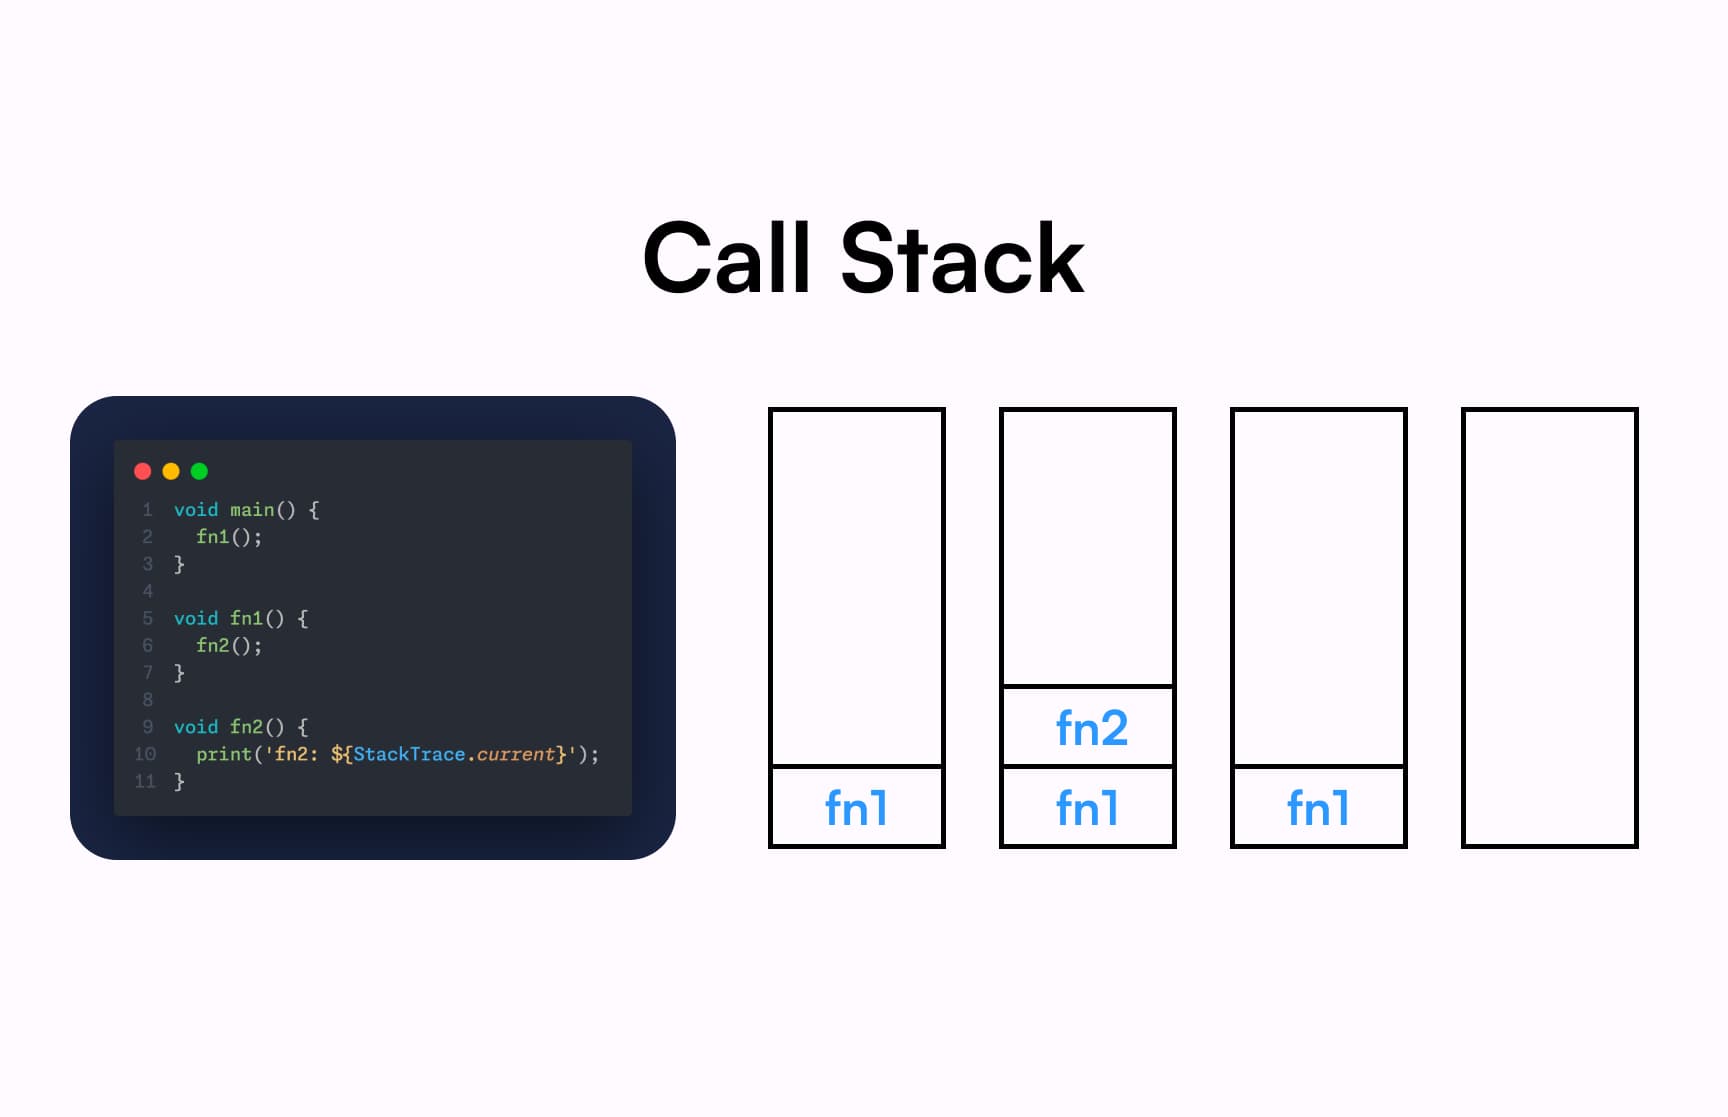
Dart manages functions with a call stack, sequentially tracking each active function. Functions leave the stack upon completion, returning control. The process on picture above unfolds as follows:
maincallsfn1fn1callsfn2fn2callsprintprintperforms an action, then exitsfn2completesfn1completesmaincompletes
When Dart encounters an exception, it appends the current stack trace to it, aiding significantly in debugging. You can access this stack trace using catch. Here's how it works:
Handling uncaught errors
Applications often handle known exceptions with "on" handlers, while unhandled unknown exceptions are usually propagated. Addressing these exceptions might be impractical, so their propagation is a common best practice. See this example:
If exceptions are not handled in their call sites, they become uncaught, stopping the isolate they occur in. In the main isolate, this can halt the entire application. To manage this, set up a root error handler to catch all uncaught exceptions:
runZonedGuarded(
  () => AppRunner().initializeAndRun(),
  (error, stackTrace) => logger.logZoneError(error, stackTrace),
);
Place this at your application's root. runZonedGuarded encloses the code within a Zone, so that all uncaught exceptions will be reported to it.
Handling Flutter Errors
When developing a Flutter application, consider overriding two key callbacks:
- FlutterError.onError: Triggered by widget-related issues, such as a RenderFlex overflow.
- PlatformDispatcher.onError: Activates on platform exceptions, like MethodChannel failures.
// somewhere in the root
FlutterError.onError = logger.logFlutterError;
WidgetsBinding.instance.platformDispatcher.onError = logger.logPlatformDispatcherError;

// logger sources
/// Handy method to log [FlutterError]
void logFlutterError(FlutterErrorDetails details) {
  if (details.silent) {
    return;
  }

  final description = details.exceptionAsString();

  error(
    'Flutter Error: $description',
    error: details.exception,
    stackTrace: details.stack,
  );
}

/// Handy method to log [PlatformDispatcher] error
bool logPlatformDispatcherError(Object error, StackTrace stackTrace) {
  this.error(
    'Platform Dispatcher Error: $error',
    error: error,
    stackTrace: stackTrace,
  );
  return true;
}
Reporting errors
Error tracking tools like Sentry or Crashlytics observe app performance on user devices, identifying and logging errors. Ensure all uncaught errors are reported to these services.
I usually set up error listeners in the logger to automatically report every logged error to an error-tracking service. Example implementation provided:
// Stream of error logs from logger
Stream<LogMessage> get _reportLogs => _logger.logs.where(_isError);
// function that enables reporting, subscribes to error logs stream
Future<void> enableReporting() async {
// stream of logs
_subscription ??= _reportLogs.listen((log) async {
await _report(log);
});
}
// function that sends exception to sentry
Future<void> _report(LogMessage log) async {
final error = log.error;
final stackTrace = log.stackTrace;
await Sentry.captureException(error ?? log.message, stackTrace: stackTrace);
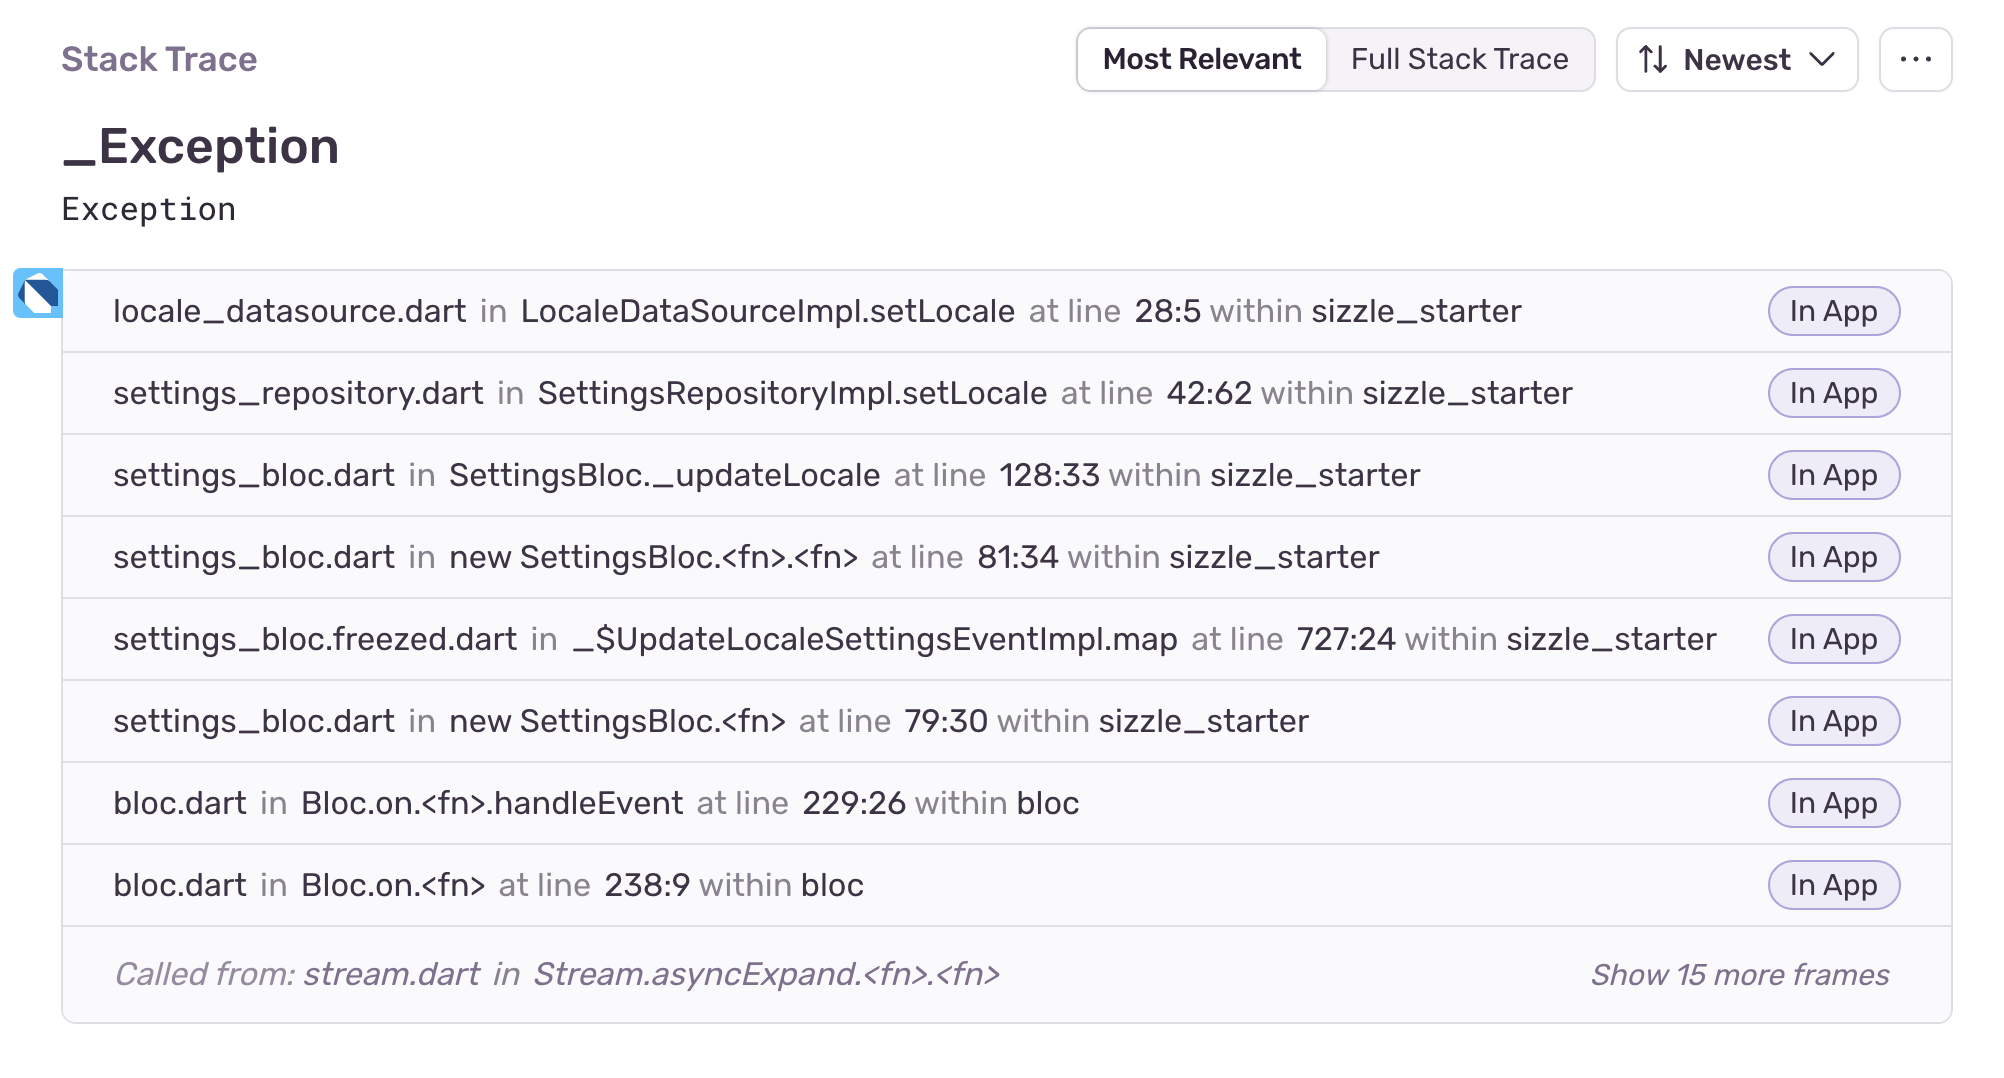
}This code monitors the stream of errors, forwarding all events to Sentry. Consequently, every error, whether uncaught or manually generated, is captured and displayed in Sentry:

We can now view errors occurring on user devices, along with stack traces. This makes identifying the source of the error straightforward. Look:
Take a look at my template for a comprehensive example of exception handling in both Dart and Flutter:
 hawkkiller
How to use exceptions
Exceptions provide insights into specific errors as they carry useful information about an exception. Learn how to use them effectively in your applications with the following practical examples.
Block user that abuses otp
Applications often use OTPs for user identity verification, reducing bot presence. But without proper checks, this method is prone to abuse. OTPs, typically sent via costly SMS (about $0.1 per message), can strain budgets if misused. To counter this, companies may limit OTP requests or block accounts.
Consider this backend response indicating a UserIsBlocked error. It includes a 'code' field for identification and a 'block duration' detailing the time period of the user block:
{
    "status": "error",
    "error": {
        // 10001: User is blocked for some time.
        "code": 10001,
        "details": {
            "block_duration": "3600",
            "message": "User is blocked. Retry after 1h."
        }
    }
}
JSON structure for UserBlocked exception
On the client side, we need to create an exception to represent this structure:
/// Thrown when the user is blocked from using OTP.
final class OtpUserBlockedException implements Exception {
  /// The duration for which the user is blocked.
  /// If it is null, the user is blocked indefinitely.
  final Duration? blockDuration;

  /// Optional message providing more details about the exception.
  final String? message;

  const OtpUserBlockedException({
    this.blockDuration,
    this.message,
  });

  @override
  String toString() => "OtpUserBlockedException: $blockDuration";
}
Custom UserBlocked exception
The 'OtpUserBlockedException' contains two fields, 'message' and 'blockDuration', provided by the backend. They will be used later on the screen to display a fancy SnackBar.
This exception should be raised from the Data Source when the backend reports corresponding error. See it in action:
class OtpDataSource {
  final RestClient _client;

  const OtpDataSource(this._client);

  /// Sends an OTP to the user's phone number.
  ///
  /// Throws [OtpUserBlockedException] if the user is blocked from using OTP.
  Future<void> sendOtp(String phoneNumber) async {
    try {
      await _client.post('/otp/send', data: {
        'phone_number': phoneNumber,
      });
    } on CustomBackendException catch (e, stackTrace) {
      if (e.error
          case {
            'code': 'OTP_USER_BLOCKED',
            'block_duration': final int blockDuration,
            'message': final String message,
          }) {
        Error.throwWithStackTrace(
          OtpUserBlockedException(
            message,
            Duration(seconds: blockDuration),
          ),
          stackTrace,
        );
      }
      rethrow;
    }
  }
}
RestClient is a class that uses HTTP client internally and manages requests and responses. It raises CustomBackendException if the backend signals an error. The data source then verifies if the error code matches 'OTP_USER_BLOCKED' and, if so, throws the corresponding exception.
The OtpBloc is designed to manage this exception by transitioning into a new failure state, ensuring that the exception is not propagated further and thus avoiding it becoming unhandled.
final class OtpBloc extends Bloc<OtpEvent, OtpState> {
  OtpBloc(
    this._otpRepository, [
    super.initialState = const OtpIdleState(),
  ]) {
    on<OtpEvent>((event, emit) {
      return switch (event) {
        OtpSendEvent sendEvent => _sendOtp(sendEvent, emit),
      };
    });
  }

  final OtpRepository _otpRepository;

  Future<void> _sendOtp(
    OtpSendEvent event,
    Emitter<OtpState> emitter,
  ) async {
    try {
      emitter(const OtpProgressState());
      await _otpRepository.sendOtp(event.phoneNumber);
      emitter(const OtpSuccessState());
    } on OtpUserBlockedException catch (e) {
      logger.warning('User is blocked for ${e.blockDuration}');
      emitter(OtpFailureState(e));
      // There is no rethrow as the exception is handled.
    } catch (e) {
      emitter(OtpFailureState(e));
      rethrow;
    }
  }
}
Handling this exception without rethrowing is critical to prevent it from reaching the root zone handler. If it does, it will be logged in a tracking manager, which is undesirable behavior.
This exception can now be handled by the OtpScreen widget that utilizes this bloc, allowing it to present a useful message to the user and restrict the resend functionality:
class _OtpScreenState extends State<OtpScreen> {
  late final OtpBloc _otpBloc;
  late final _phoneController = TextEditingController();

  /// Seconds for which the user is blocked from using OTP.
  var _restrictedFor = 0;

  /// Whether the user is blocked from using OTP indefinitely.
  bool _restrictedIndefinitely = false;

  /// Timer to update the UI with the remaining time.
  Timer? _restrictTimer;

  @override
  void initState() {
    _otpBloc = OtpBloc(
      Dependencies.of(context).otpRepository,
    );
    super.initState();
  }

  @override
  void dispose() {
    _otpBloc.close();
    _phoneController.dispose();
    _restrictTimer?.cancel();
    super.dispose();
  }

  /// Requests for OTP to be sent to the user's phone number.
  void _sendOtp() => _otpBloc.add(OtpSendEvent(_phoneController.text));

  /// Listens to the [OtpBloc]
  void _otpListener(BuildContext context, OtpState state) {
    // if request is in progress, do nothing
    if (state.isProcessing) return;

    final success = state.isSuccess;

    // if request was successful navigate to the next screen
    if (success) {
      // Navigate to the next screen.
      Navigator.of(context).pushNamed('/otp/verify');
      return;
    }

    final failure = state.failure;

    // handle specific cases
    if (failure is OtpUserBlockedException) {
      final duration = failure.blockDuration;

      // if duration is not provided (null) then the user is blocked permanently
      if (duration == null) {
        _restrictedIndefinitely = true;
        return;
      }

      // Set the values to update the UI and start the timer.
      setState(() {
        _restrictedFor = duration.inSeconds;
      });
      _restrictTimer?.cancel();
      _restrictTimer = Timer.periodic(
        const Duration(seconds: 1),
        (_) {
          setState(() {
            _restrictedFor--;
          });

          if (_restrictedFor == 0) {
            _restrictTimer?.cancel();
          }
        },
      );
    }
  }

  bool get restrictInput => _restrictedIndefinitely || _restrictedFor > 0;

  String? get message {
    if (_restrictedIndefinitely) {
      return 'You are blocked indefinitely.';
    }

    if (_restrictedFor > 0) {
      return 'You are blocked for $_restrictedFor seconds.';
    }

    return null;
  }

  @override
  Widget build(BuildContext context) => Scaffold(
        appBar: AppBar(
          title: const Text('OTP'),
        ),
        body: BlocConsumer<OtpBloc, OtpState>(
          listener: _otpListener,
          bloc: _otpBloc,
          builder: (context, state) {
            final processing = state.isProcessing;

            return Column(
              children: [
                const Text('Enter your phone number to receive OTP.'),
                TextField(
                  controller: _phoneController,
                  decoration: InputDecoration(
                    hintText: 'phone',
                    errorText: message,
                  ),
                ),
                ElevatedButton(
                  onPressed: restrictInput ? null : _sendOtp,
                  child: processing ? CircularProgressIndicator() : const Text('Send Otp'),
                ),
              ],
            );
          },
        ),
      );
}
The OtpScreen widget is a screen that contains a textfield for the phone number and a button to request an OTP for the specified phone number. The SendOtp method adds a new event to the bloc and the listener reacts to the states of the bloc.
If the request is successful, the bloc emits a success state and the listener navigates the user to the verification screen. If the request is unsuccessful, it handles the failure and provides a descriptive message to the user.
In this code snippet, widget checks for the OtpUserBlockedException. The code initiates a timer and sets the _restrictedFor variable to a specified time. If the user is blocked indefinitely, then the corresponding variable is also filled.
Finally, the UI updates according to the state changes (setState in the timer triggers a rebuild every second until finished). This is a simplified version and obviously has drawbacks, but it conveys the main idea of managing exceptions.
Best practices
Handling exceptions can be challenging as there are many pitfalls. This section provides answers to the questions 'What to do' and 'What not to do'.
Don't swallow errors & stack traces
Ensure you don't lose errors and stack traces. They're crucial in understanding what's going wrong in the application and are critical for debugging.
DO always rethrow errors that are not handled by your code. If a function cannot handle an error, it should pass it on, rather than stopping its propagation. This ensures that all errors are properly addressed, even if they are not recognized or understood by the current call site.
DO use 'Error.throwWithStackTrace' for throwing errors. Unlike the standard 'throw', this method retains the original stack trace.
BAD:
try {
  publishPost();
} on PostPublishException catch (e) {
  // logic to handle exception
} catch (e) {
  // swallow exception
  print('There was a problem: ${e.message}');
}
try {
publishPost();
} catch (e) {
// losing stack trace
throw PostPublishException(e);
}GOOD:
try {
  publishPost();
} on PostPublishException catch (e) {
  // logic to handle exception
}
try {
publishPost();
} catch (e, stack) {
Error.throwWithStackTrace(PostPublishException(e), stack);
}Keep interfaces focused
Ensure your module interfaces are straightforward. For instance, if a method is designed to return a list of posts, it should return exactly that: a list of posts.
DON'T return nulls for errors, as it complicates usability and increases error risks in code. This practice necessitates manual value matching and excessive, error-prone boilerplate code.
DON'T use 'Either' for error handling. It complicates interfaces and error management, making debugging challenging due to lost stack traces (more about it in the next chapter).
BAD:
abstract interface class PostsDataSource {
    // Don't return null if there is an error.
    Future<Post?> getPost(int id);

    // Don't return empty list if there is an error as well.
    Future<List<Post>> getPosts();

    // Don't use Either type to return error or data.
    Future<Either<Post, Exception>> sendPost(Post post);
}
GOOD:
abstract interface class PostsDataSource {
    // No nulls.
    Future<Post> getPost(int id);

    // No empty lists.
    Future<List<Post>> getPosts();

    // No Either type.
    Future<ID> sendPost(Post post);
}
Create custom exceptions
Create exceptions that are understood by your system. For example, define a 'NetworkException' in your system to handle all internet-related issues, such as timeouts and slow connections.
DO implement an 'Exception' interface for custom exceptions. This approach allows for better handling of known issues compared to relying on external dependencies.
class NetworkException implements Exception {
  final String message;
  final int statusCode;

  NetworkException({
    this.message = '',
    this.statusCode = 500,
  });

  @override
  String toString() => 'NetworkException: $message, $statusCode';
}
Network Exception that carries optional message and status code
class AuthBlockedForUserException implements Exception {
  final String message;

  /// The duration for which the user is blocked.
  final Duration blockedDuration;

  AuthBlockedForUserException({
    required this.blockedDuration,
    this.message = '',
  });

  @override
  String toString() => 'AuthBlockedForUserException: $message, $blockedDuration';
}
Auth Blocked Exception that carries the duration and message fields
class RevokeTokenException implements Exception {
  final String message;

  RevokeTokenException({
    this.message = 'Token is invalid or expired.',
  });

  @override
  String toString() => 'RevokeTokenException: $message';
}
Revoke Token Exception that indicates invalid or expired token
Catch asynchronous errors
When you are dealing with asynchronous code, always make sure that you don't miss asynchronous errors.
DO await for futures to complete inside your try/catch block. If you do not await the future, the try/catch will not catch the exception.
BAD:
Future<String> preloadData() async {
  await Future.delayed(Duration(seconds: 2));
  throw Exception('Failed to preload data.');
}

Future<void> main() async {
  try {
    preloadData();
  } catch (e) {
    // This will not be printed.
    print(e);
  }
}
GOOD:
Future<String> preloadData() async {
  await Future.delayed(Duration(seconds: 2));
  throw Exception('Failed to preload data.');
}

Future<void> main() async {
  try {
    await preloadData();
  } catch (e) {
    // error will be caught
    print(e);
  }
}
What about Either
Either or Result is a data type from functional programming used to handle errors. It returns errors, rather than throwing them, which can initially seem simpler but actually increases complexity and the risk of mistakes.
Libraries often offer the 'Either' data type. However, to create it yourself, you just need three classes:
sealed class Either<L, R> {
  const Either();

  T when<T>({required T Function(L left) left, required T Function(R right) right});
}

class Left<L, R> extends Either<L, R> {
  final L value;

  const Left(this.value);

  @override
  T when<T>({required T Function(L left) left, required T Function(R right) right}) {
    return left(value);
  }
}

class Right<L, R> extends Either<L, R> {
  final R value;

  const Right(this.value);

  @override
  T when<T>({required T Function(L left) left, required T Function(R right) right}) {
    return right(value);
  }
}
Either data type implementation
Code using 'Either' avoids 'throw' statements. Methods return either an error or success, with 'Left' indicating errors and 'Right' for successes. To get the results, you need to use when method as follows:
  final response = await client.send(otp);

  response.when(
    left: (failure) {
      // handle failure
    },
    right: (data) {
      // handle data
    },
  );
On the left, failures are addressed, and on the right, data is managed. The issue arises when both successes and errors are processed together, resulting in cumbersome logic. In contrast, the try/catch method distinctly separates data handling in 'try' and error management in 'catch'.
class OtpDataSourceEither {
  final RestClient _client;

  const OtpDataSourceEither(this._client);

  /// Sends an OTP to the user's phone number.
  ///
  /// Throws [OtpUserBlockedException] if the user is blocked from using OTP.
  Future<Either<Exception, void>> sendOtp(String phoneNumber) async {
    try {
      await _client.post('/otp/send', data: {
        'phone_number': phoneNumber,
      });

      return const Right(null);
    } on CustomBackendException catch (e, stackTrace) {
      if (e.error
          case {
            'code': 'OTP_USER_BLOCKED',
            'block_duration': final int blockDuration,
            'message': final String message,
          }) {
        return Left(
          OtpUserBlockedException(
            blockDuration: Duration(seconds: blockDuration),
            message: message,
          ),
        );
      }
      return Left(e);
    }
  }
}
The updated code now returns 'Right(null)' for successful OTP sending and 'Left' for exceptions. However, this minor adjustment has brought about some challenges and pitfalls:
- Handling both errors and responses in one location can complicate readability.
- Each method must now return 'Either' and manage it.
- The StackTrace is lost because 'throw' is no longer used.
- When method returns void we still need to return Right(null) - looks weird.
Another problem with Either is that all Dart code is throwable. This means we need to catch an exception using try/catch, then wrap it in Either. It also implies Dart libraries expect throwable code, not Either.
For instance, Bloc has a BlocObserver that reports errors occurring in your blocs. Riverpod uses a similar approach with their AsyncValue union class and observer. By using Either, you limit the use of these features and introduce new complexities.
The common argument is that Either makes your code safer as each error is addressed. However, this isn't typically the case in real-world applications. We usually have a layered architecture with a data source, repository, bloc, and widgets. Most often, errors are managed on two levels:
- Data source - this component transforms source-specific exceptions (like DioException or DriftException) into system-recognized exceptions, such as ConnectionException or UserNotFoundException.
- Bloc (or controller) - this can handle errors or emit a new state containing the error so widgets can provide a user message.
The data source uses external data providers (like dio, drift, or firebase), so you still need to catch exceptions to convert them to Either and map to your own exception type. This process is the same without Either. We write similar code, but for some reason wrap it with Either and use return instead of the built-in throw, potentially losing stackTrace.
At the Bloc (Controller) level, we need to catch an exception and handle it. This process can be more challenging and less clear with Either, as we need to create IFs to match errors instead of the clean on syntax in try. Additionally, experienced developers always add try/catch clauses at controller levels to address all exceptions as a rule.
In summary, my argument is that Either in Dart is not only unhelpful but also destructive. It introduces complexities and isn't widely recognized by packages and the community, making it an unstable solution. Either should be supported and encouraged by the SDK itself (like in Go) to work effectively. However, in the context of Dart, it isn't applicable and likely won't be in the future.
Ending
Thanks for reading! Don't miss my next article - subscribe to my Telegram channel, LinkedIn, and X for more updates.